Mittwoch, 8. September 2010

Transformationator Version 1.0.1

Hi everybody!

I've been busy improving the sample playback engine of the Transformationator:


First and foremost, the Transformationator is now able to play stereo files, as well as mono files!

Second, I've added a loop-crossfade to avoid clicks while scrubbing through the loop. This means that, as the playhead reaches the end of the loop point, playback from the beginning of the loop-selection fades in, while the rest of the loop is faded out. You can edit the amount of the crossfade application via the 'Crossfade' control which replaced the fade-in and fade-out controls.

I have also improved the panorama controls in order to adapt it to the new stereo behaviour.

You can download the new version here:
http://dl.dropbox.com/u/110461/maxupyourlive/Transformationator%201.0.1.amxd

Here are a few tricks to get started with the Transformationator:

  • The Transformationator is an amazing noise machine. It is, however sometimes a bit bitchy, as the engine running in the background is fairly complex (I've built it all from scratch). So, sometimes, if you go wild with the controls (especially with fast scrubbing speeds), the crossfade might go off track. The result is a fade-in ending in a peak and an immediate fall to zero, starting the fade in again. If that happens, just switch scrubbing on and off subsequently to fix the crossfade. That should do it. I'm working on a more precise playback-detection algorithm to avoid this issue and I hope to improve it in the near future.
  • You'll find that fast scrubbing sometimes doesn't lead to very nice results. This, most of the time, being a high-pitched, annoying and strange sound (which might as well be what you wanted, though). This is because the loop going on inside the playhead (the grain loop) is not fast enough for the playhead itself to catch up. Just turn up the tuning control to make this up, as the tuning increases the speed of the grain loop.
  • The Transformationator is optimized for playback of samples of a length of up to 120 seconds. Of course it's possible to load longer samples. However, you'll find that the loop lenght is restricted to 120 seconds. I have done this to make loop length selection a bit smoother and to avoid endless parameter setting. If you want to change this behaviour, open the Max patch and edit the max. setting for the 'L Length' parameter in the inspector.
As a general advise: Don't open the Max patch, it's pure chaos!! :-)

However, I still hope that you're enjoying the Transformationator. And let me know what you think of it!!

So long,
Matt

Dienstag, 24. August 2010

Granular Sample/Loop Player

I'm excited to present the the first Max4Life device I actually think is worth sharing. It took me a couple of days to build it, but here it is, at last: The Transormationator! :-)

The principle is easy. The Transformationator splits the audio sample into little bits. so-called grains. You can then define the size of the grains and their pitch. To be honest, it's just a loop that adjusts its size according to the pitch setting, so that the loop always has the same perceptible length. I have then added another loop player that lets you scrub automatically through the sample. So, basically, it's a loop player that loops the playing position of another loop. The result is an incredible noise-machine!

You can get extreme noise out of it, or even the subtlest and creepiest background noises. Just give it a try.


Parameter overview:

Sound: Enables/disables audio output
Clear: Deletes sample and resets scrub-loop length
Tune: Rough tuning of the grains' pitch
Fine Tune: Fine tuning of the grains' pitch
Position: Manually sets the playback position
Gr. Size: Size of the grains
Scrub On/Off: Start/Stop scrubbing through sample
Speed: Playback speed
L Start: Start point of the loop in % (example: 0 starts at the beginning, 100 starts at the end)
L Length: Loop length in ms
Fade In: Defines the length of the fade-in at the beginning of the loop (to avoid clicks)
Fade Out: Defines the length of the fade-out at the end of the loop (to avoid clicks)
Pan: Self-explanatory
Random On/Off: Enables/disables random panning
Pan Speed: Defines the speed of random panning
Volume: Master volume control

Oh yes, nearly forgot. Feel free to download it here:

http://dl.dropbox.com/u/110461/maxupyourlive/Transformationator.amxd

I have also uploaded a short demo video to show you what the Tranformaitonator is capable of! Let me know what you think of it. I am aware of the fact that it is far from being a perfect audio device. I would like to add some more features, such as random playback position and a crossfade function for the scrub loop. I'll get you posted on any improvements.


Thanks for reading (and watching)!!
Cheers,
Matt

Donnerstag, 19. August 2010

Saving Tempo Automation Presets

Are you working with long tracks, sometimes involving more or less complicated tempo automation? Well, I do. I'm involved in a traditional Rock band environment an therefore rather obliged to follow fixed tempo curves. The problem with Live is that it doesn't let you save the tempo automation you've meticulously assembled for one track; and if you want to use the same track in another project, you'll have to do it all over again.
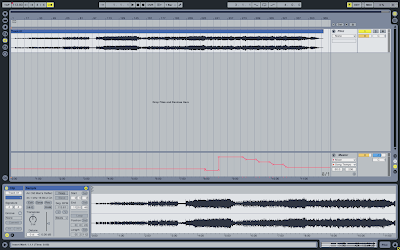
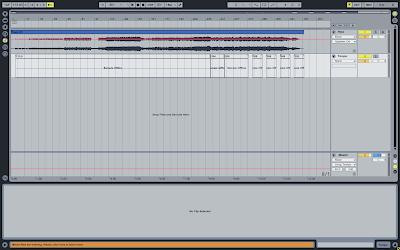
I've found a workaround that lets you save even the most detailed tempo automation curves. Assume we have a finished track with a fixed tempo automation curve. We've imported the track and set the tempo, including falling ramps to make it a bit more complicated.


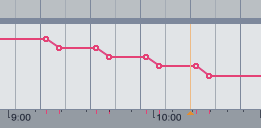
We can see that the tempo automation curve is quite detailed. First we have a long stretch of 113.80 bpm, then it falls down to 104 bpm for a short period. Then it goes up to 208 bpm, eventually gradually falling down to 128 bpm, including some ramps, every 12 bars. And exactly this is what we want to be able to recreate and make accessible in any other live set.

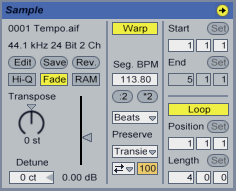
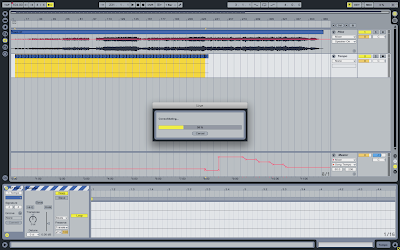
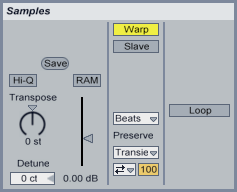
First we create a 4-Bar dummy clip (if you don't know how to create a dummy clip you can read it up in my post on dummy clips). We then set the clip's tempo in the clip box, appropriately to the track's initial tempo (in this case 113.80 bpm). You can find the tempo field just underneath the 'Warp' button, entitled 'Seg. BPM'. Then we place it into the arrangement and duplicate it as many times as is desired for 113.80 bpm. After that, we select all the duplicated clips and consolidate them into one single clip (cmd-J on a Mac and ctrl-J on a PC).


We have now a clip set to 113.80 bpm spanning the time for 113.80 bpm in the arrangement. We now do the same for the next part of the arrangement, the part with 104 bpm. And then the same for the part with 208 bpm. The next step is to ignore the ramps. So we instead concentrate on the 12-bar parts between the ramps. Every ramp falls down by 20 bpm, so we will have a 12-bar clip set to 188 bpm, one set to 168 bpm, one set to 148 bpm, and the the last one set to 128 bpm (don't forget to set their tempo in the clip box).

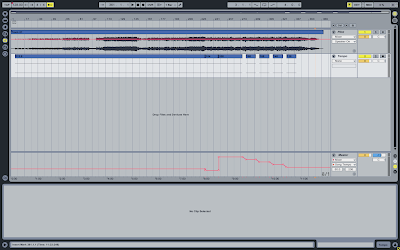
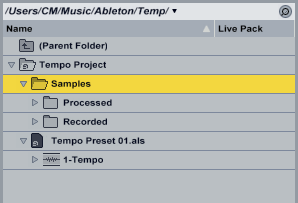
The next thing we do is drag the track into a previously defined folder in the browser. This is the place where we store our tempo automation presets. After doing so, there is the neat part about that technique: We can delete the folder containing the samples associated with our tempo track. The reason for doing this is that we don't need the audio files we have created, we just need the tempo information we have stored in the clips. Another reason is that we end up using kilo-bites of information instead of mega-bites.

Now we're ready to test our preset. We close the project and drag in the song we've used to create our tempo preset. We then drag in our tempo preset track and align the clips so that they match the song (you'll see Live complaining about missing audio files, but we've consciously deleted them, so just ignore it).


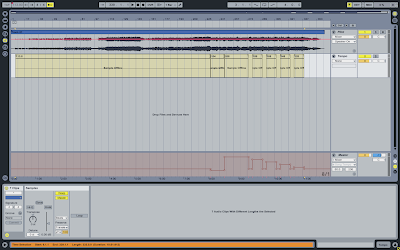
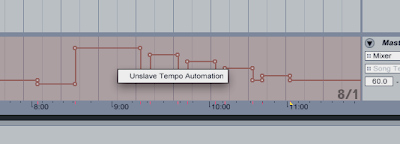
Note that I've set the initial clip of the tempo track according to the first attack of the guitar from the beginning of this tutorial. You can as well set the beginning of your own tempo clips on the first beat of your song, it doesn't really matter. Next thing we do is we select all the clips on the tempo track and activate the little button titled 'Slave' in the clip box. That sets the clips in to 'Tempo Master Mode'. It actually means that they now define Live's tempo automation. We also see that the tempo automation lane is colored red, i.e. locked and in slave mode.


If we now right-click (or cmd-click on a Mac) into the tempo automation lane, we see a dialogue menu entry saying 'Unslave Tempo Automation'. This is what we do.


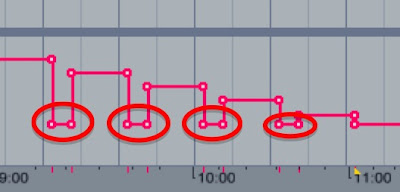
But we can also see that our ramps have disappeared. No need to panic, we just have to delete the additional breakpoints we don't need.


And finally, we've been able to recreate our tempo automation curve, ready to be dragged it into any Live set we want. The only thing we have to do in each case is delete the additional break points in order to get our ramps back. If there are no ramps, it's even easier.

I'm aware of the fact that it takes a bit of time to get the dummy clips aligned that to set their tempo, but I'm of the opinion that it's well worth the effort if you can then just drag in your preset track, set the clips to master, 'unslave' the tempo automation curve and delete the additional breakpoints; instead of doing it manually every time you have to use that song in a Live set.

I hope that this tutorial was any help for you! For me, in any case, this technique is a time saver, as I often work with different Live sets containing songs that I've already got in an other Live set. To manually set the tempo automation is a bugger, we all know that. This here prevents us from doing it more than once.

Thanks for reading!
So long, and cheers,
Matt

Freitag, 23. Juli 2010

I'm back!!

Hi everybody!!

It's been a long time I've been absent from this blog. This is mainly due to some family business I couldn't ignore and some projects I've been working on and that have kept me incredibly busy. I'll post some results as soon as they're ready for publication. In the meantime, you could still get an update on my band's facebook page http://www.facebook.com/katergon or on our website http://www.katergon.net.

Enough advertising; let's get cracking. I'd like to get started with a rather small detail some of you may know; but it took me quite some time to find out what it's all about: unlinked clip envelopes.

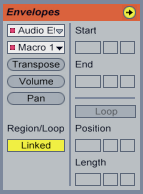
If you double-click on a clip, you'll see its waveform and its properties. With the little "E"-button you an activate the clip's envelopes tab. Here you can select the parameter you wish to modulate with the envelope. But you'll also notice the little button called 'Linked' beneath the heading 'Region/Loop'. This unlinks the envelope from the clip's loop time. In other words, you can now define a separate loop time for the envelope that has nothing to do with the clip's loop time.

You'll also notice that the loop-bars change their colour to orange. That means the envelope's loop is running independently and can be edited without affecting the actual clip's loop settings.

This may be an obvious and absolutely normal step in your work with clips. Nevertheless, it is a feature that is somehow hidden and not so obvious for others. In any case, it expands your creative potential with clips to a significant degree; and for those who didn't know this feature, it's a clear win. It was for me, anyway, when I discovered unlinked envelopes; I had a whole new world of modulation right beneath my fingertips.

I strongly recommend to play around with unlinked envelopes and you'll see that some crazy stuff can be made with them. I hope this post has helped in any way and that I'll be able to post a bit more regularly from now on.

So long,
Matt

Mittwoch, 5. Mai 2010

Sorry folks!

Hi everybody.

This is just to say that I have not forgotten or abandoned this blog. It just happens to be the case that, at the moment, family situation and University demand a bit more from me than I wish.

I will post the next useful article some time in the very near future; promise!

Until then, stay tuned!

Thanks mates!
Matt

Sonntag, 14. März 2010

Easy External Instrument Sampling

Hi folks! It's time for a post. This time covering a sampling trick:

Have you ever wanted to multi-sample an external instrument (like a modular synthesizer, a Moog, etc.) but in the end you just didn't do it because the amount of work you would have had to do was just too much? I have a little trick for you that solves the problem. Just let Live do the work for you.

Set up the external instrument you want to sample the way you always do it, using Live's 'External Instrument' tool. Add the desired effects and plug-ins to shape the sound. Then create a MIDI clip on the track by double-clicking on an empty clip-slot and set its length (this will determine the samples' final length). Start by creating a MIDI note on C3 (or whatever C-Number you find appropriate) and drag it so that it covers the whole length of the clip. Now copy the clip onto the next clip-slot and set that note to C#3. You repeat that step until you have covered the total range of octaves you want to sample. In my example I have just covered one octave (C3-C4).
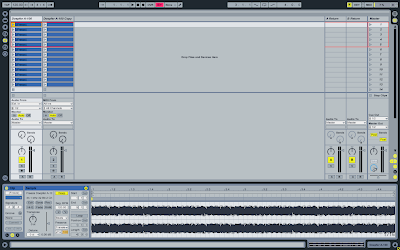
Now comes the trick: Freeze the track by right-clicking on its header and choosing 'Freeze Track' (if you want to re-use the original setting later, just duplicate the track). This might take a while, as Live has to sample the external instrument in real time. After the sampling process is finished it might look as follows:

We now have a frozen and an unfrozen version of our external instrument track. In order to obtain the audio files that were created during the freezing process you just flatten the track by right-clicking on the track's header and choosing 'Flatten'.

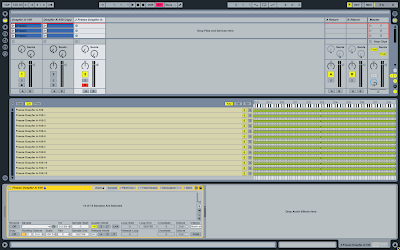
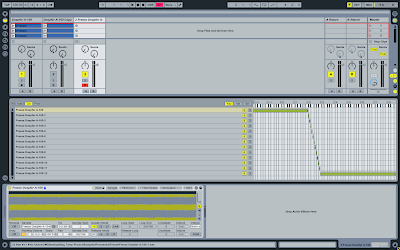
You can now see that the clips that were once MIDI clips are now audio clips containing the audio samples you can now drag into Sampler. Just create a new MIDI track hosting sampler and select and drag the audio clips into Live's Sampler. In the zone-view you can now see that all the samples share the same key-zone. We'd have to correct this by assigning every sample an individual key on the keyboard.


In order to do that you just hold down a key, double click on the sample's key-zone bar and set it's root-key to the note you just held down.

That's it. We have sampled our external instrument using Live's freeze function. There's no need in buying a sampling software, we can do it inside Live and let Live do the dirty work.

Once again I'd like to express my thanks Dankmar Klein, who has kindly shared this trick with me.

See you soon!
Cheers,
Matt

Mittwoch, 3. März 2010

Dummy Clips

Nothing is more comfortable than being able to change effect presets by the press of one button, especially when you're on stage. That's why I have decided to dedicate my first post to the so-called 'dummy clips'.

'Dummy clips' are audio clips that do not contain any audible audio, but are only (mis-)used for automation purposes in the Session View. The easiest way to demonstrate how 'dummy clips' work is to build a small effects unit containing 4 effect presets that allows us to quickly jump from one effect preset to an other by the press of a single button.

Depending on the source of audio we want to route through the effects unit (be it the output of MIDI-instruments, pre-recorded audio, or live audio), we need at least one track to fulfill our purpose. In any case we need an audio track (we call it 'Effects') which hosts the effects plug-ins we need for our effects unit and which passes through all of our audio we want to process. What is important here is that we set the monitoring to 'In' because we want to be able change our effect presets in real time and not to listen to pre-recorded audio material. We won't be able to hear the output of any audio clips on that track anymore. In order to route audio onto the 'Effects' track we set the audio output (Audio To) of our audio source track to 'Effects' and set the input of our 'Effects' track to 'No Input'. That way we guarantee that we only receive audio from our pre-defined audio sources.

The next step is that we create an 'Audio Effect Rack' which hosts 4 chains (the number of effects presets we want to be able to access). Into those chains we load the effects plug-ins we wish in order to achieve four different-sounding effects presets. It is now important that we clearly define the zones for each effects chain. For that purpose we open the chain zones editor and align the zones accordingly.

We can now create our first 'dummy clip'. We make sure that the source track is mute or does not produce any audio output and hit the record/play button of the first clip slot on the 'Effects' track. It is now entirely up to us to decide how long the clip should be, but a 4 bar audio clip should do just fine. After the recording process, we see that the clip is empty. We can now copy it three times onto the next three clip slots on the 'Effects' track. Those clips are going to be our triggers to choose between our four effects presets.

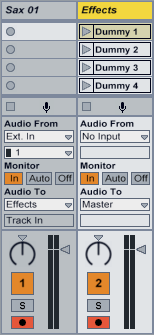
In the example on the left, I have set up two audio tracks. One receives the audio input of a live instrument (a Saxophone) and the other is our 'Effects' track containing an 'Audio Effect Rack' and our four 'dummy clips'. I could as well have done without the 'Sax 01' track and set the input of the 'Effects' track to 'Ext In --> 1'. But that way, I have exclusively reserved the 'Effects' track for audio processing purposes, which for me, personally, simplifies the whole issue by assigning the 'Effects' track the sole purpose of being an effects unit.

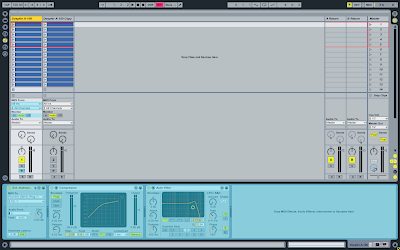
The next step is that we open the clip/automation settings for the first 'dummy clip'. We hit the round 'Envelopes' button labeled 'E' and select the 'Audio Effect Rack' in the device list. In the parameter list we select 'Chain Selector' (sorry it says 'Macro 1 in my example picture, it should be 'Chain Selector). We are now able to move the automation line on the right into the zone range of our first chain: 0-31 (remember, we have defined the zone of our effect chains earlier on). We do the same with the three remaining 'dummy clips', moving the automation line into the effect chain's corresponding zone ranges (32-63; 64-95; 96-127). It is, however, important to make sure that the actual 'chain selector' in the 'Audio Effect Rack' remains in its original position, as the clip automation doesn't work with total automation values, but with percentages of the actual controller value.

We should now be able to route any audio to our 'Effects' track and switch between our four pre-defined effects presets by playing back our 'dummy clips'. We could even take it a step further and draw other automation lines for filter cutoffs or other parameters; just the way we want it.

As you may have seen, 'dummy clips' offer a new approach to working with audio clips in Live and demonstrate how flexible the software actually is. As you play around with the various signal routing techniques, racks of any kind and automation using clips, you'll quickly find other interesting ways to tweak your audio.

I hope this post has somehow helped to understand the concept of 'dummy clips' and that you feel inspired to go and play with them and see what you can do with them.

Just go and play around and see what YOU can do with it; I think that is one of the philosophies that lies at the core of Live.

I would like to express my thanks to Dankmar Klein, who has kindly introduced little me into the world of 'dummy clips' and clip automation in general!

Yours,
Matt

Dienstag, 23. Februar 2010

Cheers everybody!

Hi Folks!

So, this is my first post in this blog that I've just set up. Even if I'm Swiss and my native language is German, I'm going to keep this in English since I'd like speakers of English to be able to follow (if there will be any in the future).

My intention is to share tips and tricks that I have learned, seen and discovered using Ableton Live and, more interestingly, Max4Live. Ableton Live is a versatile piece of software that sometimes puzzles you by its pure simplicity. The result is that you rarely think of the obvious until you see it in a youtube video, on the Ableton Forums, or in a blog like this. Thus, I will try to collect as many useful tips and tricks as possible, ranging from simple recording and signal routing techniques, instrument sampling tricks, up to techniques to be used in sound design.


As for Max4Live, I am still learning but quickly making progress and beginning to see its potential to turn Ableton Live into a fully modular production environment (and with "modular" I mean modular-synthesizer-ish modular). I will also upload some of the devices I have created for you to test, reverse-engineer and use in your Live sets.


For any of the tips that will be published on this blog applies the following:
If I have found them via a web based source, such as youtube, facebook, twitter, blogs, etc. I will, of course, add a reference to that particular source at the bottom of my posts. I do not intend to plagiarise.


Expect my first post some time during the next week.

Enjoy!
Matt