Hi everybody.
This is just to say that I have not forgotten or abandoned this blog. It just happens to be the case that, at the moment, family situation and University demand a bit more from me than I wish.
I will post the next useful article some time in the very near future; promise!
Until then, stay tuned!
Thanks mates!
Matt
Mittwoch, 5. Mai 2010

Sonntag, 14. März 2010
Easy External Instrument Sampling
Hi folks! It's time for a post. This time covering a sampling trick:
Have you ever wanted to multi-sample an external instrument (like a modular synthesizer, a Moog, etc.) but in the end you just didn't do it because the amount of work you would have had to do was just too much? I have a little trick for you that solves the problem. Just let Live do the work for you.
Set up the external instrument you want to sample the way you always do it, using Live's 'External Instrument' tool. Add the desired effects and plug-ins to shape the sound. Then create a MIDI clip on the track by double-clicking on an empty clip-slot and set its length (this will determine the samples' final length). Start by creating a MIDI note on C3 (or whatever C-Number you find appropriate) and drag it so that it covers the whole length of the clip. Now copy the clip onto the next clip-slot and set that note to C#3. You repeat that step until you have covered the total range of octaves you want to sample. In my example I have just covered one octave (C3-C4).
Now comes the trick: Freeze the track by right-clicking on its header and choosing 'Freeze Track' (if you want to re-use the original setting later, just duplicate the track). This might take a while, as Live has to sample the external instrument in real time. After the sampling process is finished it might look as follows:
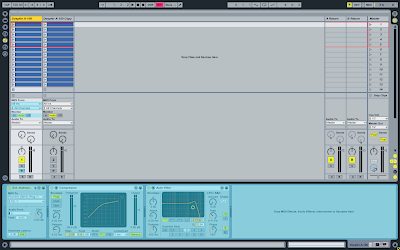 We now have a frozen and an unfrozen version of our external instrument track. In order to obtain the audio files that were created during the freezing process you just flatten the track by right-clicking on the track's header and choosing 'Flatten'.
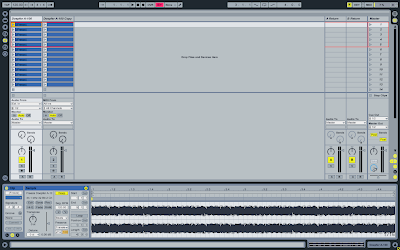 You can now see that the clips that were once MIDI clips are now audio clips containing the audio samples you can now drag into Sampler. Just create a new MIDI track hosting sampler and select and drag the audio clips into Live's Sampler. In the zone-view you can now see that all the samples share the same key-zone. We'd have to correct this by assigning every sample an individual key on the keyboard.
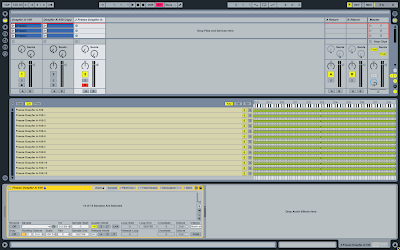
In order to do that you just hold down a key, double click on the sample's key-zone bar and set it's root-key to the note you just held down.
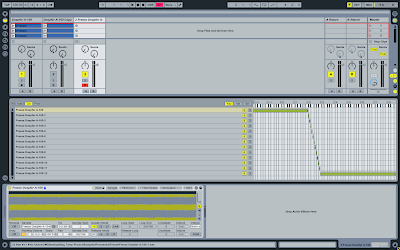 That's it. We have sampled our external instrument using Live's freeze function. There's no need in buying a sampling software, we can do it inside Live and let Live do the dirty work.
Once again I'd like to express my thanks Dankmar Klein, who has kindly shared this trick with me.
See you soon!
Cheers,
Matt
Have you ever wanted to multi-sample an external instrument (like a modular synthesizer, a Moog, etc.) but in the end you just didn't do it because the amount of work you would have had to do was just too much? I have a little trick for you that solves the problem. Just let Live do the work for you.
Set up the external instrument you want to sample the way you always do it, using Live's 'External Instrument' tool. Add the desired effects and plug-ins to shape the sound. Then create a MIDI clip on the track by double-clicking on an empty clip-slot and set its length (this will determine the samples' final length). Start by creating a MIDI note on C3 (or whatever C-Number you find appropriate) and drag it so that it covers the whole length of the clip. Now copy the clip onto the next clip-slot and set that note to C#3. You repeat that step until you have covered the total range of octaves you want to sample. In my example I have just covered one octave (C3-C4).
Now comes the trick: Freeze the track by right-clicking on its header and choosing 'Freeze Track' (if you want to re-use the original setting later, just duplicate the track). This might take a while, as Live has to sample the external instrument in real time. After the sampling process is finished it might look as follows:
 We now have a frozen and an unfrozen version of our external instrument track. In order to obtain the audio files that were created during the freezing process you just flatten the track by right-clicking on the track's header and choosing 'Flatten'.
 You can now see that the clips that were once MIDI clips are now audio clips containing the audio samples you can now drag into Sampler. Just create a new MIDI track hosting sampler and select and drag the audio clips into Live's Sampler. In the zone-view you can now see that all the samples share the same key-zone. We'd have to correct this by assigning every sample an individual key on the keyboard.
In order to do that you just hold down a key, double click on the sample's key-zone bar and set it's root-key to the note you just held down.
 That's it. We have sampled our external instrument using Live's freeze function. There's no need in buying a sampling software, we can do it inside Live and let Live do the dirty work.
Once again I'd like to express my thanks Dankmar Klein, who has kindly shared this trick with me.
See you soon!
Cheers,
Matt
Mittwoch, 3. März 2010
Dummy Clips
Nothing is more comfortable than being able to change effect presets by the press of one button, especially when you're on stage. That's why I have decided to dedicate my first post to the so-called 'dummy clips'.
'Dummy clips' are audio clips that do not contain any audible audio, but are only (mis-)used for automation purposes in the Session View. The easiest way to demonstrate how 'dummy clips' work is to build a small effects unit containing 4 effect presets that allows us to quickly jump from one effect preset to an other by the press of a single button.
Depending on the source of audio we want to route through the effects unit (be it the output of MIDI-instruments, pre-recorded audio, or live audio), we need at least one track to fulfill our purpose. In any case we need an audio track (we call it 'Effects') which hosts the effects plug-ins we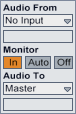 need for our effects unit and which passes through all of our audio we want to process. What is important here is that we set the monitoring to 'In' because we want to be able change our effect presets in real time and not to listen to pre-recorded audio material. We won't be able to hear the output of any audio clips on that track anymore. In order to route audio onto the 'Effects' track we set the audio output (Audio To) of our audio source track to 'Effects' and set the input of our 'Effects' track to 'No Input'. That way we guarantee that we only receive audio from our pre-defined audio sources.
The next step is that we create an 'Audio Effect Rack' which hosts 4 chains (the number of effects presets we want to be able to access). Into those chains we load the effects plug-ins we wish in order to achieve four different-sounding effects presets. It is now important that we clearly define the zones for each effects chain. For that purpose we open the chain zones editor and align the zones accordingly.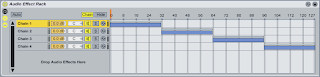
We can now create our first 'dummy clip'. We make sure that the source track is mute or does not produce any audio output and hit the record/play button of the first clip slot on the 'Effects' track. It is now entirely up to us to decide how long the clip should be, but a 4 bar audio clip should do just fine. After the recording process, we see that the clip is empty. We can now copy it three times onto the next three clip slots on the 'Effects' track. Those clips are going to be our triggers to choose between our four effects presets.
In the exampl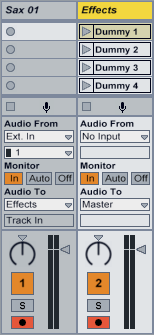 e on the left, I have set up two audio tracks. One receives the audio input of a live instrument (a Saxophone) and the other is our 'Effects' track containing an 'Audio Effect Rack' and our four 'dummy clips'. I could as well have done without the 'Sax 01' track and set the input of the 'Effects' track to 'Ext In --> 1'. But that way, I have exclusively reserved the 'Effects' track for audio processing purposes, which for me, personally, simplifies the whole issue by assigning the 'Effects' track the sole purpose of being an effects unit.
The next step is that we open the clip/automation settings for the first 'dummy clip'. We hit the round 'Envelopes' button labeled 'E' and select the 'Audio Effect Rack' in the device list. In the parameter list we select 'Chain Selector' (sorry it says 'Macro 1 in my example picture, it should be 'Chain Selector). We are now able to move the automation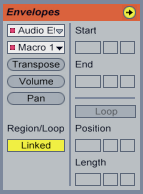 line on the right into the zone range of our first chain: 0-31 (remember, we have defined the zone of our effect chains earlier on). We do the same with the three remaining 'dummy clips', moving the automation line into the effect chain's corresponding zone ranges (32-63; 64-95; 96-127). It is, however, important to make sure that the actual 'chain selector' in the 'Audio Effect Rack' remains in its original position, as the clip automation doesn't work with total automation values, but with percentages of the actual controller value.
We should now be able to route any audio to our 'Effects' track and switch between our four pre-defined effects presets by playing back our 'dummy clips'. We could even take it a step further and draw other automation lines for filter cutoffs or other parameters; just the way we want it.
As you may have seen, 'dummy clips' offer a new approach to working with audio clips in Live and demonstrate how flexible the software actually is. As you play around with the various signal routing techniques, racks of any kind and automation using clips, you'll quickly find other interesting ways to tweak your audio.
I hope this post has somehow helped to understand the concept of 'dummy clips' and that you feel inspired to go and play with them and see what you can do with them.
Just go and play around and see what YOU can do with it; I think that is one of the philosophies that lies at the core of Live.
I would like to express my thanks to Dankmar Klein, who has kindly introduced little me into the world of 'dummy clips' and clip automation in general!
Yours,
Matt
'Dummy clips' are audio clips that do not contain any audible audio, but are only (mis-)used for automation purposes in the Session View. The easiest way to demonstrate how 'dummy clips' work is to build a small effects unit containing 4 effect presets that allows us to quickly jump from one effect preset to an other by the press of a single button.
Depending on the source of audio we want to route through the effects unit (be it the output of MIDI-instruments, pre-recorded audio, or live audio), we need at least one track to fulfill our purpose. In any case we need an audio track (we call it 'Effects') which hosts the effects plug-ins we
 need for our effects unit and which passes through all of our audio we want to process. What is important here is that we set the monitoring to 'In' because we want to be able change our effect presets in real time and not to listen to pre-recorded audio material. We won't be able to hear the output of any audio clips on that track anymore. In order to route audio onto the 'Effects' track we set the audio output (Audio To) of our audio source track to 'Effects' and set the input of our 'Effects' track to 'No Input'. That way we guarantee that we only receive audio from our pre-defined audio sources.
The next step is that we create an 'Audio Effect Rack' which hosts 4 chains (the number of effects presets we want to be able to access). Into those chains we load the effects plug-ins we wish in order to achieve four different-sounding effects presets. It is now important that we clearly define the zones for each effects chain. For that purpose we open the chain zones editor and align the zones accordingly.

We can now create our first 'dummy clip'. We make sure that the source track is mute or does not produce any audio output and hit the record/play button of the first clip slot on the 'Effects' track. It is now entirely up to us to decide how long the clip should be, but a 4 bar audio clip should do just fine. After the recording process, we see that the clip is empty. We can now copy it three times onto the next three clip slots on the 'Effects' track. Those clips are going to be our triggers to choose between our four effects presets.
In the exampl
 e on the left, I have set up two audio tracks. One receives the audio input of a live instrument (a Saxophone) and the other is our 'Effects' track containing an 'Audio Effect Rack' and our four 'dummy clips'. I could as well have done without the 'Sax 01' track and set the input of the 'Effects' track to 'Ext In --> 1'. But that way, I have exclusively reserved the 'Effects' track for audio processing purposes, which for me, personally, simplifies the whole issue by assigning the 'Effects' track the sole purpose of being an effects unit.
The next step is that we open the clip/automation settings for the first 'dummy clip'. We hit the round 'Envelopes' button labeled 'E' and select the 'Audio Effect Rack' in the device list. In the parameter list we select 'Chain Selector' (sorry it says 'Macro 1 in my example picture, it should be 'Chain Selector). We are now able to move the automation
 line on the right into the zone range of our first chain: 0-31 (remember, we have defined the zone of our effect chains earlier on). We do the same with the three remaining 'dummy clips', moving the automation line into the effect chain's corresponding zone ranges (32-63; 64-95; 96-127). It is, however, important to make sure that the actual 'chain selector' in the 'Audio Effect Rack' remains in its original position, as the clip automation doesn't work with total automation values, but with percentages of the actual controller value.
We should now be able to route any audio to our 'Effects' track and switch between our four pre-defined effects presets by playing back our 'dummy clips'. We could even take it a step further and draw other automation lines for filter cutoffs or other parameters; just the way we want it.
As you may have seen, 'dummy clips' offer a new approach to working with audio clips in Live and demonstrate how flexible the software actually is. As you play around with the various signal routing techniques, racks of any kind and automation using clips, you'll quickly find other interesting ways to tweak your audio.
I hope this post has somehow helped to understand the concept of 'dummy clips' and that you feel inspired to go and play with them and see what you can do with them.
Just go and play around and see what YOU can do with it; I think that is one of the philosophies that lies at the core of Live.
I would like to express my thanks to Dankmar Klein, who has kindly introduced little me into the world of 'dummy clips' and clip automation in general!
Yours,
Matt
Dienstag, 23. Februar 2010
Cheers everybody!
Hi Folks!
So, this is my first post in this blog that I've just set up. Even if I'm Swiss and my native language is German, I'm going to keep this in English since I'd like speakers of English to be able to follow (if there will be any in the future).
My intention is to share tips and tricks that I have learned, seen and discovered using Ableton Live and, more interestingly, Max4Live. Ableton Live is a versatile piece of software that sometimes puzzles you by its pure simplicity. The result is that you rarely think of the obvious until you see it in a youtube video, on the Ableton Forums, or in a blog like this. Thus, I will try to collect as many useful tips and tricks as possible, ranging from simple recording and signal routing techniques, instrument sampling tricks, up to techniques to be used in sound design.
As for Max4Live, I am still learning but quickly making progress and beginning to see its potential to turn Ableton Live into a fully modular production environment (and with "modular" I mean modular-synthesizer-ish modular). I will also upload some of the devices I have created for you to test, reverse-engineer and use in your Live sets.
For any of the tips that will be published on this blog applies the following:
If I have found them via a web based source, such as youtube, facebook, twitter, blogs, etc. I will, of course, add a reference to that particular source at the bottom of my posts. I do not intend to plagiarise.
Expect my first post some time during the next week.
Enjoy!
Matt
So, this is my first post in this blog that I've just set up. Even if I'm Swiss and my native language is German, I'm going to keep this in English since I'd like speakers of English to be able to follow (if there will be any in the future).
My intention is to share tips and tricks that I have learned, seen and discovered using Ableton Live and, more interestingly, Max4Live. Ableton Live is a versatile piece of software that sometimes puzzles you by its pure simplicity. The result is that you rarely think of the obvious until you see it in a youtube video, on the Ableton Forums, or in a blog like this. Thus, I will try to collect as many useful tips and tricks as possible, ranging from simple recording and signal routing techniques, instrument sampling tricks, up to techniques to be used in sound design.
As for Max4Live, I am still learning but quickly making progress and beginning to see its potential to turn Ableton Live into a fully modular production environment (and with "modular" I mean modular-synthesizer-ish modular). I will also upload some of the devices I have created for you to test, reverse-engineer and use in your Live sets.
For any of the tips that will be published on this blog applies the following:
If I have found them via a web based source, such as youtube, facebook, twitter, blogs, etc. I will, of course, add a reference to that particular source at the bottom of my posts. I do not intend to plagiarise.
Expect my first post some time during the next week.
Enjoy!
Matt
Abonnieren
Posts (Atom)
